Module #1: Updated

Update! In my previous post, I shared several H5P’s I created from Lumi. I thought it was going to be a breeze to upload my H5P’s to Moodle. Unfortunately, I encountered several errors. Instead of trying to figure out why they were not uploading, I ended up creating new H5P’s right in my Moodle course. I created H5P’s for Course Presentations, Quizzes, and Interactive Videos. I enjoy using H5P’s because I can make them as simple as an Entrance or Exit Slip type formative assessment, to something more complex like a quiz that contains several different types of questions. Since I am unable to share a direct link to my Moodle platform, I’ve prepared a Screencast guiding you through my course. You can access it by clicking on the following link.

Below are a few screenshots of my course.


lets Learn With Lumi!!!!

Since I have never worked as a teacher in Canada, the curricula and methods of instruction differ greatly from those in my native nation. Many of the teachers on this site have blogs, and while I learn a lot from them, I also feel overwhelmed when I realize that I also have to create something similar. Only Zoom was utilized to give courses to students in grades kindergarten through twelve in my own country during the COVID-19 pandemic. Hence, I find that making activities on different applications by utilizing different features can be a little difficult and time-consuming for me.

But now I’m here to improve my abilities. To help kindergarten students strengthen their fundamentals and read more fluently, my course prototype teaches them “letters and sounds”. This will also make learning new material easier for them.

I’ll utilize the first two exercises to build on and examine their letter recognition.

LUMI Activity #1

Lumi Activity #2

Next, to teach them phonetics, I have attached a YouTube video. The YouTube video isn’t interactive because this lesson plan is meant for pupils in the 3–6 age range. Being novices, they are currently unable to read..

YouTube Videohttps://youtu.be/ChqnN3cKzXQ?si=B5WnojBketa6Vjq4

In addition, H5P offers the opportunity to create a “speak the words” exercise Lumi Activity #3. In this activity, students can speak and review their responses. However, It doesn’t react to one or two-word sounds because of a technological error. Subsequently, I organized to drill letters and sounds exclusively in class. I can instruct them face-to-face, observe, mentor, and administer formative and summative assessments.


.

Posted in Uncategorized

Interactive H5P for Literacy Classes

With a lot of perseverance, Anchal and I set out on the difficult task of constructing H5P.  We was annoyed at first because we were unable to seem to access Lumi’s functions. We have been wondering for the past week why we find it difficult to share our modules, yet our classmates seem to be sharing them actively. We started to realize how important it is for individuals to grasp the concept of technology. We overcome challenges because we were passionate about incorporating interactive into our prototype, which helps communities of refugees in areas where language problems are common. Although developing these interactive video take time, but once you have done your students can learn a lot from it. With H5P’s help, we recently uploaded a video from YouTube that shows the difficulties experienced by communities of refugees. It is certainly not easy to leave one’s beloved hometown and seek shelter in a foreign land where learning a new language is required. Here is a link please click

NOTE: The worksheets follow the guidelines set forth by RIWC and are made to be easily understood by students who use Google Translate, especially those who might require explanations in Ukrainian. These worksheets are designed at a basic level so that each student’s abilities are addressed.

Module-1 of Interactive English Classes:

How to Greet Someone

I developed Module 1 for this prototype, which teaches students how to greet people in English using both the formal and informal language. One of the worksheets in the curriculum walks students through various greetings ways. The second exercise offers a discourse between two friends. Exercise 3 explores how contractions are used in English. In the last task, students practice writing a brief message by using the knowledge they have gained throughout the session. In the first interactive video I have included MCQ. True/False and Fill-up to make the video interactive. Module 2 of prototype is developed by my friend Anchal

Canvas Worksheet 1 

Interactive video

Module- 2  Grocery shopping

Canvas Worksheet2

Interactive video

Quiz

Posted in Uncategorized

Interactive H5P for literacy classes

With a lot of perseverance, Jaswinder and I set out on the difficult task of constructing H5P video. We were annoyed at first because we were unable to seem to access H5P functions. We have been wondering for the past week why we find it difficult to share our models, yet our classmates seem to be sharing them actively. We started to realize how important it is for individuals to grasp the concept of technology. We overcame this challenge because we were passionate about incorporating H5P video into our prototype, which helps communities of refugees in areas where language problems are common. We are certain that our students will gain a great deal from using H5P in our teaching strategy. Although developing H5P takes time,  once you have done so, your students can learn a lot from it.
With H5P we recently created an interactive  YouTube video that shows the difficulties experienced by communities of refugees. It is certainly not easy to leave one’s beloved hometown and seek shelter in a foreign land where learning a new language is required. Here is the link please click.

We chose the first level of our course prototype to describe through H5P videos, as our primary motive is to make them speak, so we incorporated basic routine-based topics in this session. However, we will tailor our teaching according to the learning capacity of these learners so that they will build their confidence.

Module 1 How to Greet Someone 


Interactive video 

Worksheet 1

Module 2 Grocery shopping  


I have created this Module 2, in order to build their understanding of English by watching it remembering it solving the questions that are being asked through the interactive videos. In this interactive video, various types of questions are incorporated, including statement choices, True/False questions, and single-choice questions to engage the learners. I covered terminology relating to groceries and payment procedures in Module 2. The first warm-up question in the module asks students to state their basic needs. After that, an exercise in role-playing dialogue is set up. Grocery matching quiz is also included . In the last they will write a paragraph writing.

Interactive video 

Worksheet 2

Quiz

Posted in Uncategorized

LUMI# Module 1:- Differentiate between living and non-living things

LUMI provides intuitive tools to help for stay on track and implement different questions such as multiple choice, fill in the blanks, true/false, and so many others. In this module, basic information is provided about living and nonliving things which helps the learners of grade 1 to build more interest in science.

Here is the YouTube video that will be helpful for kids.

For my interactive LUMI  lesson, I choose a YouTube video around 3:36 minutes  in which plenty of examples are given that showing the difference of living and non living things. Grade 1 students really enjoying this video and I mention some questions on this video that helps the kids to rethinking the things again.  Here is the link, please open this

https://taranpreet.h5p.com/content/1292208430241267718

To explain more about the living and non living things, I create a worksheet for grade 1 students  and for doing this assignment kids can be easily able to differentiate between  living and non living thing. The worksheet contains total 10 marks in which 4 are multiple choice questions, 3 are fill in the blanks and remaining 3 marks for the activity in they find two living and non-living things in their surroundings and draw them on the scrapbook.

Here is the link of Worksheet:-   :- https://k12.instructure.com/courses/1484691/assignments/6957727

Posted in Uncategorized

Mental Health Studies Module #1- Lumi

In the first module of my Mental Health Studies course, I have used several H5P activities. When I first started working with H5P’s it took me quite a while to get the hang of it, but now I am quite familiar with them and enjoy using them to create interactive content for my online classes. What is really convenient about H5P’s is that I can create them through Lumi, download them and embed them into Moodle.

In this first module, I will use a combination of formative and summative assessments

Welcome Module!

Lumi Activity#1: What Brings You Here?

Module 1- Introduction to Mental Health

Outcomes: MHS20.1

  • I can understand what positive mental health is and how it affects my well-being.
  • I can advocate, raise awareness and reduce stigma for positive mental health.
  1. Pre-Quiz: Students will complete a questionnaire  Lumi Activity #2 to see what they believe they already know about mental health.
  2. Lesson #1: Introduction to Mental Health Presentation Lumi Activity #3 I have embedded questions in the presentation, so as students go through the presentation, they will be asked to answer questions and check their understanding.
  3. Lesson #2: We are going to explore the difference in Mental Health States. In the video, Dr. Kutcher explains the different states of mental health Lumi Activity #4
  4. Assessment on lesson 1 and 2 to test understanding of the various mental health states. Lumi Activity #5

Lumi

Next month my grade 6 students will begin to look at the Shape & Space strand,  starting with Understanding Angles. My module focuses on the first lesson of the unit “In The Real World”. Grade 6 is the first year that students really dive into working with angles, and I have always believed that it is important for students to see their math outside of the classroom. With Lumi I was able to create a video that visually accommodated this goal. Students will access this module from Google Classroom with a link to their Google Site. When they get to the site they will navigate their way to Lesson 1: In The Real World. The layout is quite simple so that students do not get overwhelmed and can ease into their learning. Below is a breakdown of how students will work through the module.

Step 1: Video – Students will watch the interactive Lumi video.

Step 2: Notes – Students can choose to copy their notes during or after the video is complete. I decided to do fill-in-the-blank notes to save time and keep students engaged. Having notes to go along with the video also ensures students will watch it (or at least part of it).

Step 3: Paper Practice – These questions are meant to support the video and notes provided in steps 1 and 2. They are not graded but students will have a chance to correct their work during the “pause” portion of the module.

Step 4: Padlet – In the past, I have used Mathletics as a formative assessment for each lesson. However, real-world application is never an assignment option. In this case, I decided to use Padlet so that students can see and share the experience with their classmates. With the focus of this lesson being that angles are everywhere, I thought it was necessary for students to physically find objects around them. If you are unfamiliar with Padlet, it is a digital board on which students can collaboratively post comments, pictures etc. The expectation for my students on this step will be for them to walk around the class and find 5 examples of angles, take a photo of one and post it on Padlet for their classmates to see. I will then use their responses as a formative assessment.

Step 5: Every 2 lessons students will complete a paper exit ticket which they hand to me before moving on to lesson 2. Since this is lesson 1, they will not do an exit ticket.

My students have been using Google Sites since the start of the school year. I have been trying to figure out how to make it more engaging and personalized. With using Lumi to create my own videos (own voice) instead of random YouTube videos I think my students will look forward to watching the videos and actually being able to interact with them. Padlet will also help with engagement as students get to see what their classmates post and share their learning with one another.

Module Links


Lumi to the rescue!

Developing interactive instructional materials with Lumi was an interesting – and often challenging – experience.  BUT, Lumi eventually won me over, despite a few glitches and frustrations.  I’m quite happy with the interactive videos and games created so far, and look forward to exploring more. 

Overview of Course in Development

The online course I’m developing is Compressed Gas Safety, a blended/hybrid course intended for UofR engineering graduate students, research staff and supervisors (professors or Principal Investigators/PIs).  There may be the occasional and slight deviation from this demographic, in that a few lab instructors need training; there are also occasional 5th year undergraduate students who complete their capstone projects in our research labs.  

Participants will complete the basic mandatory Chemical & Lab Safety training (including WHMIS) and an online general safety orientation before attempting the Compressed Gas Safety course.  Participants must also have a designated lab for their research.  (We simply do not have the resources to provide the in-person component to students who are just curious or just have a general interest, but no intention of using the actual training).  The course starts with an online/asynchronous component, in which they learn hazard identification, safe handling techniques, emergency procedures, etc., and ultimately complete a safe operating procedure (SOP) for use in their research.  This is followed by an in-person hands-on training session in their own lab with their own supervisor.  Students must submit their completed in-person training checklist (signed by the supervisor) in order to receive a certificate of completion.  I provided the course rationale previously, with my course profile and ADDIE template posted on our EC&I 834 blog

(My post became very long – read the rest here!)

Posted in Uncategorized

Module One with LUMI: A Work in Progress

Welcome to my first module! 🙂 

I actually had a ton of fun bringing this module to life over the past couple of weeks. From the initial planning with the ADDIE model to creating educational content on Lumi, I am enjoying the process so far! As I am sure we can all agree, learning something new is challenging but ultimately rewarding; my experience with Lumi (so far) has been just that. 


Lumi experience:

I will admit, it took me a minute (ok…an hour) to get the hang of the interactions (so many options!) and decide what would work best for my learners. Once I explored the vast menu of interactions and experienced (lots of) trial and error, I felt more at ease. Also, the site has a lot of free informative material available, which was super helpful!

For my interactive Lumi lesson, I chose a short YouTube video introducing the basic elements of a fairy tale. Typically, I use this brief video (1:19) in class to begin my fairy tale unit. In past years, I have played this video twice, sometimes three times, for students so they can digest the quick, new content. As well, I would always stop the video multiple times to discuss the information being presented. Transforming the video into an interactive media is a game changer! The interactive elements allowed me to (in a way) mimic the in class discussion/interaction, for students to engage with the content independently during this online module.

You may notice the frequency of the added interactions in my Lumi video. To best engage my young learners, I added interactive elements often. This will help students stay focused on the content and allows me to formatively assess their understanding throughout. I primarily used multiple choice, open ended and true/false questions. My goal was to keep the questions short and simple to ensure my learners could complete them independently and successfully. At the end, I included a fill in the blanks and a summary activity.

Some closing thoughts on Lumi (with my minimal experience)

  • Learning Lumi can overwhelming
  • Very time-consuming to start
  • With some time/effort, Lumi is actually quite user friendly
  • The finished product is very satisfying 
  • Formatting or editing interactions is TEDIOUS (but worth it)
  • Interactive elements serve as simple formative assessment
  • Interactivity key for online learning
  • Free version is sufficient
  • Endless possibilities with paid subscription

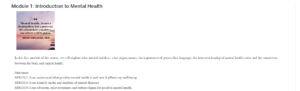
Module One (so far…)

I have began the ‘shell’ for my first blended learning module on Seesaw, the LMS I’ve selected. Using the Seesaw ACTIVITY feature, I explain each step for Module One: Introduction to Fairy Tales. The learning activities are as follows:

Module 1: Introduction to Fairy Tales

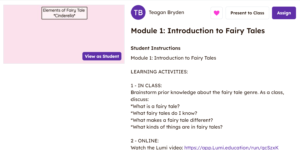
LEARNING ACTIVITIES: 


1 – IN CLASS: Brainstorm prior knowledge about the fairy tale genre. As a class, discuss: 


What is a fairy tale? What fairy tales do I know? What makes a fairy tale different?  What kinds of things are in fairy tales? 

2 – ONLINE: Watch the Lumi video: https://app.Lumi.education/run/gcSzxK *There are questions to answer throughout the video – make sure you watch closely! 

3 – ONLINE: Watch the video version of the classic fairy tale, Cinderella: https://www.youtube.com/watch?v=BXDsucz23OA 

4 – ONLINE: Complete the Seesaw activity: Fairy Tale Elements in Cinderella. https://app.seesaw.me/pages/shared_activity?prompt_id=prompt.8e79df50-d32d-4601-8890-dc71d83877a1&share_token=teyfap7tRfyTlQ_CKQzOvw


Assessment of Module One:

Diagnostic – During the first, in person, learning activity, students will share their prior knowledge of fairy tales. Using class discussion (partner, small group and whole class) students will consider what they already know about this genre.

Formative – The interactions in my Lumi lesson will serve as formative assessment for this module. Students will answer various questions, throughout the video, to display their understanding of the elements of a fairy tale. *Without a paid Lumi subscription, I can’t access the results. To check in on student learning, I will ask them to either show me their results (in person) or have them upload a photo of them to Seesaw. Based on the results of these interactive questions, I will,  if needed, either re-assign this video for students to view again and/or provide further in class instruction on these elements.

Summative – After the Lumi lesson, students will demonstrate their understanding of fairy tale elements via a Seesaw assessment activity. Students will watch a version of Cinderella and then complete the corresponding Seesaw activity on the elements in this fairy tale. This will be assessed using our division’s 4-point evaluation scale. *I am still working on this Seesaw activity template – stay tuned!

Links:

This module remains a work in progress. Feedback (especially on my Lumi video) is much appreciated! Also, I am interested in everyone else’s Lumi experience? Anyone else have a kind of love/hate opinion of this program?

– Teagan

Using Seesaw To Teach Kindergarten Students

Upon viewing YouTube videos, What Teachers can learn from YouTubers about Engaging Students online and Make Super Simple Videos for Teaching Online quickly realized that nearly anybody could create a video about teaching or any other topic. But we hardly take the lead; instead, we continuously put things off by worrying too much about how I will appear. What will the public say? How am I going to balance my academics and work? What happens if I later
run out of video ideas? I don’t have the newest iPhone or a camera to take better photos, and I
don’t have any additional useful accessories.
Teaching kindergarten pupils “letters and sounds” was the focus of my Addie Model lesson plan.
I had the chance to teach online during COVID-19, and that’s when I realized that lesson
planning, activity planning, and learning new pedagogies were a little less difficult than making
kindergarten students watch those instructional videos and sit through a long Zoom class
online. They are too young for this, that’s the reason. When it comes to online learning, most
students are uninterested in and unwilling to view instructional films, even though they have
unlimited access to cartoons and other amusing media.
My current goal is to make kindergarten kid’s learning experiences engaging and dynamic, thus
for all the reasons listed below, I will be utilizing Seesaw in my instruction.
1. Seesaw is available for use by parents, instructors, and kids. Seesaw allowed parents to
monitor their children’s academic progress and stay updated on what was happening in the
classroom.
2. Teachers can take pictures, make videos, and publish them to Seesaw. These can relate to the
class’s current activities, forthcoming projects, or lesson plans.
3. Teachers can post preview videos and images of the next class activities ahead of time for
students to view before class in order to help them get ready for them.

4.Easy, engaging exercises can be planned and created by teachers for their students.
5. In my view, students frequently become disinterested in practicing, such as when it comes to
repeating activities like watching recorded videos, reading the same book, or listening to the
teacher. However, teachers can employ engaging exercises and a variety of activities to review the
same material with Seesaw’s assistance. It helps teachers solidify their fundamentals while also
breaking up the routine.

Posted in Uncategorized